By Nikhil Swaminathan, Sr. Product Manager, AWS Amplify, originally published on GitHub
Prior to joining Amazon, I cofounded an EdTech startup called Classalyze (classroom analytics for teachers and administrators) that was incubated at the Pearson Learning Accelerator. I ran the startup as the CTO for three years, built the MVP before we were able to afford an engineering team, ran sales and operations once the product features were more mature, and grew the team to 10 full-time people until we eventually shut down three years later (which can be its own post!). Post-startup life, I joined AWS and now work on Amplify, which makes it easier for startups to ship products.
In case you’re not familiar with it, AWS Amplify offers fullstack (frontend+backend) developer tools – the command line interface (CLI) simplifies deploying backend resources such as authentication, APIs, databases, and file storage; the frontend libraries and UI components make integration with the backend seamless; and the Amplify Console provides a Git-based workflow for your team to deploy and host your web app. Amplify is used by both startups and enterprises such as Hypertrack, Noom, BMW, Coca-Cola, and Airbnb.
Given my background both as a founder and at a big tech company, I wanted to share my experience and advice for turning your idea for an app into a working MVP. In Part 1, I’ll start by walking you through how to take an idea — in today’s case, an online poster business — from a concept to a real app. In part 2, we will walkthrough an end-to-end tutorial on creating the poster app.
Step 1: Validate your idea without writing a single line of code
It all starts with the idea. But while ideas are important, they are also the easiest part of any startup journey. The biggest mistake I made with my startup, was spending way too much time trying to get my initial idea to work. It is important to start with the problem your idea is solving.
For my sample online poster business idea, my hypothesis problem is that “it’s hard to to find a poster I want to pin up on my wall”. Who is the target customer with the problem? For example, maybe it’s college students. If so, do college students actually have this problem? How does the solution you’re building improve their life? The best way to go about getting answers is by talking to students via email and in-person interviews.
The next step is finding product/market fit — is the college student market large enough for your startup to be a financially viable undertaking. Spend as much time as you can in this stage without building any tech. Validate your idea by actually trying to sell posters online on Facebook groups or online college communities. If you are able to get initial traction, your idea has product/market fit and it’s time to actually build the product.
Step 2: Unpack your idea
It’s now time to unpack your idea into to a concrete set of user stories or requirements for your MVP. A minimum viable product is by definition an imperfect product. As Michael Seibel said last week, do not attempt perfection. Ship something fast, get feedback, then iterate. The MVP exists to offer value to your early customers and gives you something to show potential investors.
To define the scope of your MVP, you have to define the narrative for your product. If your problem statement is “it’s hard to to find a poster I want to pin up on my wall” then your MVP must address how this poster app makes finding the poster you want really easy (instead of simply referring to it as an online poster business). Unpack this into the following user stories (note: you will ideally have 5 to 10 times the number of stories):
Customers can browse a catalog of posters
Customers can create an account to favorite posters and view order history
Administrators can create/update/delete posters
Customers can add/remove posters to their cart and order posters.
Customers can search for posters by keyword
Customers can upload their own images to print custom posters
Given most of the requirements are in place, the next step is to define a flow. Flows are a really fast way to ensure folks on your team are aligned on the expected user interaction. Ryan Singer, a Program Manager at Basecamp, has a really good format for defining flows, which I’ve copied below.
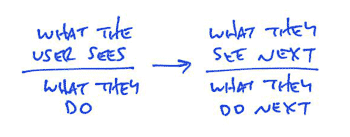
I’ve created a sample one for the poster app idea. Once the flows are sketched out, you might choose to mock screens. Personally, I think this is the right time to start building your app.

Step 3: Pick a platform as a distribution channel (web or mobile or both)
Your distribution channel is actually the most important decision. Are you building a web or mobile app or both? For example, a game might be better served on a mobile device, a productivity app might be better on a browser, while an e-commerce app would arguably be useful on both. This fundamental decision drives all your future technology decisions. For the poster app, I’d like for users to be able to make purchases on both the desktop and a mobile device. The fastest way to get to market would be to build a Progressive web app or a Single-page web app that can be rendered mobile-first on both phones and desktops. If you saw traction, then you could potentially invest further in native app experiences.
Step 4: Define your tech stack
Once you’ve picked a platform it’s time to pick a technology stack. This is either a really complicated decision or a very simple one if you or your technical cofounder is already comfortable with a particular technology. If you are building a mobile app, do you choose Swift (iOS) or Java (Android), or something cross-platform like React Native? For a web app, the choices seem endless – do you build a single page app with frameworks such as React, Vue, or Angular, or do you build server-rendered apps with more traditional (e.g. Rails, PHP) or modern (NextJS, Nuxt) frameworks? On the backend do you manage your own virtual servers (e.g. EC2) or go serverless (Lambda, AppSync, Fargate)?
There is no right decision, it’s just what you’re comfortable with. In 2013, I chose Ruby on Rails because 1) great community support – gems (or 3rd party libs) like Devise, ActiveAdmin were well adopted 2) defacto choice for most startups at the time 3) effortless deployment with Heroku 4) database – I chose Postgres mainly because Postgres and Heroku worked really well together (and I had only ever worked with relational DBs) 5) free to start.
If I were building my startup in 2020, I would choose React on the frontend and AWS Amplify for the serverless backend. The primary reasons for using Amplify: 1) really easy to get started 2) free to start and very cheap compared to Heroku even once you start acquiring customers 3) managed services such as authentication and serverless functions (no need to manage scaling servers as your traffic increases).
Step 5: Build features
Build features as per your MVP requirements. Eric Ries (author of the Lean Startup) tells startups to adopt a Build → Measure → Learn feedback loop. Ries says, “The fundamental activity of a startup is to turn ideas into products, measure how customers respond, and then learn whether to pivot or persevere.“ Startups that are able to execute the Build → Measure → Iterate cycle fast are the ones that succeed. In order to execute fast, you need to be able to build tech that can evolve as your requirements evolve. Amplify enables startups to iterate on their tech stack really quickly as requirements change.
Requirement 1: Customers can browse a catalog of posters
We need to store our poster catalog in a data store and provide a way to query or mutate the data. The Amplify command line toolchain makes it really easy to provision a GraphQL API endpoint connected to a NoSQL database (DynamoDB). If you haven’t heard of GraphQL, it is a query language for your API and provides an easy way for frontends to fetch data from servers. You can learn more about GraphQL here. Follow our getting started steps to install the CLI on your local machine.
The Amplify CLI offers a schema designer called the GraphQL transform that allows you to model your backend data objects. The schema below will create a NoSQL database with a table named Poster, an S3 bucket (S3 is a storage provider on AWS) where the poster images will be stored, and a GraphQL API endpoint which can be used to fetch/mutate the data from the frontend. To deploy these resources to the cloud all you need to do is run amplify push from the CLI. Learn more about the GraphQL Transform.
Once the deployment is complete, include the Amplify client JS library in your frontend project, and query for all the posters with the following code:
Requirement 2: Customers can create an account to favorite posters and view order history
Amplify has an authentication service that takes 10 minutes to setup. Simply run amplify add auth from the CLI, choose the defaults, and run amplify push. This will provision an authentication service with Amazon Cognito on AWS, and provide a user directory where you can manage users and groups.
Amplify has cloud connected UI components that allow you to add prebuilt UI components into your app with very few lines of code. For auth, Amplify has the Authenticator UI component that offers a basic authentication flow for signing-up/signing-in users, Multi-factor Authentication, and sign-out.
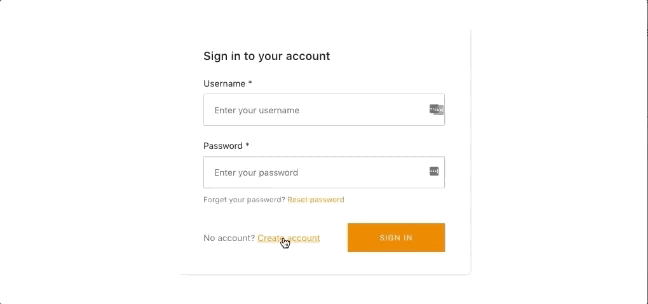
Wrap the default App component using the Authenticator by modifying your App.js file to include: export default withAuthenticator(App, true);
That’s it! With a single line of code you have fully functioning authentication service running. Checkout our authentication starter for a fully functioning sample. The Amplify Auth class has over 30 methods for building a custom flow, view our complete guide to user authentication (https://dev.to/dabit3/the-complete-guide-to-user-authentication-with-the-amplify-framework-2inh).
Requirement 3: Administrators can create/update/delete posters
Now that we have an auth service, we can also setup fine-grained authorization rules. The requirement states that only administrators are allowed to create/upload/delete new posters. The CLI allows you to modify the schema using the GraphQL transform. The following @auth rule will only allow the Admin group (created in the Auth service) to create/update/delete the posters, maintaining read access to anyone. Again, an amplify push will deploy the rule.
Step 6: Ship your MVP
Once you’ve built out all the remaining requirements its time to get user feedback. To ship our web app, we can use the Amplify Console. The AWS Amplify Console provides a Git-based workflow for hosting fullstack serverless web apps with continuous deployment. Continuous deployment allows you to automatically deploy updates on every code commit. Simply connect your application’s code repository to Amplify Console, and changes to your frontend and backend are deployed in a single workflow on every code commit. Amplify Console offers easy custom domain setup, feature branch deployments, password protection and many more features. Get started with the Amplify Console.

That’s it for Part 1! You have now learned how to model data, create a GraphQL API endpoint, set up authentication, define authorization rules, integrate cloud connected UI components in your app, and set up a CI/CD pipeline for your frontend and backend. Amplify not only gets you up and running, but also scales as your business grows as the entire backend is serverless (or fully managed by AWS so you don’t have to worry about managing servers).
In part 2, we will walkthrough an end-to-end tutorial on creating the poster app. In the mean time, learn more about AWS Amplify:
Home page: http://amplify.aws/
Docs: https://aws-amplify.github.io/
Community: https://amplify.aws/community/
awesome-amplify: https://github.com/dabit3/awesome-aws-amplify