Amazon Web Services Feed
How to use G Suite as an external identity provider for AWS SSO
Do you want to control access to your Amazon Web Services (AWS) accounts with G Suite? In this post, we show you how to set up G Suite as an external identity provider in AWS Single Sign-On (SSO). We also show you how to configure permissions for your users, and how they can access different accounts.
Introduction
G Suite is used for common business functions like email, calendar, and document sharing. If your organization is using AWS and G Suite, you can use G Suite as an identity provider (IdP) for AWS. You can connect AWS SSO to G Suite, allowing your users to access AWS accounts with their G Suite credentials.
You can grant access by assigning G Suite users to accounts governed by AWS Organizations. The user’s effective permissions in an account are determined by permission sets defined in AWS SSO. They allow you to define and grant permissions based on the user’s job function (such as administrator, data scientist, or developer). These should follow the least privilege principle, granting only permissions that are necessary to perform the job. This way, you can centrally manage user accounts for your employees in the Google Admin console and have fine-grained control over the access permissions of individual users to AWS resources.
In this post, we walk you through the process of setting up G Suite as an external IdP in AWS SSO.
How it works
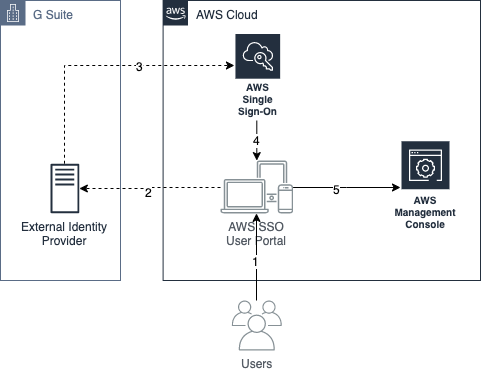
AWS SSO authenticates your G Suite users by using Security Assertion Markup Language (SAML) 2.0 authentication. SAML is an open standard for secure exchange of authentication and authorization data between IdPs and service providers without exposing users’ credentials. When you use AWS as a service provider and G Suite as an external IdP, the login process is as follows:
- A user with a G Suite account opens the link to the AWS SSO user portal of your AWS Organizations.
- If the user isn’t already authenticated, they will be redirected to the G Suite account login. The user will log in using their G Suite credentials.
- If the login is successful, a response is created and sent to AWS SSO. It contains three different types of SAML assertions: authentication, authorization, and user attributes.
- When AWS SSO receives the response, the user’s access to the AWS SSO user portal is determined. A successful login shows accessible AWS accounts.
- The user selects the account to access and is redirected to the AWS Management Console.
This authentication flow is shown in the following diagram.
Figure 1: AWS SSO authentication flow
The user journey starts at the AWS SSO user portal and ends with the access to the AWS Management Console. Your users experience a unified access to the AWS Cloud, and you don’t have to manage user accounts in AWS Identity and Access Management (IAM) or AWS Directory Service.
User permissions in an AWS account are controlled by permission sets and groups in AWS SSO. A permission set is a collection of administrator-defined policies that determine a user’s effective permissions in an account. They can contain AWS managed policies or custom policies that are stored in AWS SSO, and are ultimately created as IAM roles in a given AWS account. Your users assume these roles when they access a given AWS account and get their effective permissions. This obliges you to fine control the access to the accounts, following the shared-responsibility model established in the cloud.
When you use G Suite to authenticate and manage your users, you have to create a user entity in AWS SSO. The user entity is not a user account, but a logical object. It maps a G Suite user via its primary email address as the username to the user account in AWS SSO. The user entity in AWS SSO allows you to grant a G Suite user access to AWS accounts and define its permissions in those accounts.
AWS SSO initial setup
The AWS SSO service has some prerequisites. You need to first set up AWS Organizations with All features set to enabled, and then sign in with the AWS Organization’s master account credentials. You also need super administrator privileges in G Suite and access to the Google Admin console.
If you’re already using AWS SSO in your account, refer to Considerations for Changing Your Identity Source before making changes.
To set up an external identity provider in AWS SSO
- Open the service page in the AWS Management Console. Then choose Enable AWS SSO.

Figure 2: AWS SSO service welcome page
- After AWS SSO is enabled, you can connect an identity source. On the overview page of the service, select Choose your identity source.

Figure 3: Choose your identity source
- In the Settings, look for Identity source and choose Change.

Figure 4: Settings
- By default, AWS SSO uses its own directory as the identity provider. To use G Suite as your identity provider, you have to switch to an external identity provider. Select External identity provider from the available identity sources.

Figure 5: AWS SSO identity provider options
- Choosing the External identity provider option reveals additional information needed to configure it. Choose Show individual metadata values to show the information you need to configure a custom SAML application.

Figure 6: AWS SSO SAML metadata
For the next steps, you need to switch to your Google Admin console and use the service provider metadata information to configure AWS SSO as a custom SAML application.
G Suite SAML application setup
Open your Google Admin console in a new browser tab, so that you can easily copy the metadata information from the previous step. Now use the information to configure a custom SAML application.
To configure a custom SAML application in G Suite
- Navigate to the SAML Applications section in the Admin console and choose Add a service/App to your domain.

Figure 7: Add a service or app
- In the modal dialog that opens, choose SETUP MY OWN CUSTOM APP.

Figure 8: Set up a custom app
- Go to Option 2 and choose Download to download the Google IdP metadata. It downloads an XML file named GoogleIDPMetadata-your_domain.xml, which you will use to configure G Suite as the IdP in AWS SSO. Choose Next.

Figure 9: Download IdP metadata
- Configure the name and description of the application. Enter AWS SSO as the application name or use a name that clearly identifies this application for your users. Choose Next to continue.

Figure 10: Name and describe your app
- Fill in the Service Provider Details using the metadata information from AWS SSO, then choose Next to create your custom application. The mapping for the metadata is:
- Enter the AWS SSO Sign in URL as the Start URL
- Enter the AWS SSO ACS URL as the ACS URL
- Enter the AWS SSO Issue URL as the Entity ID

Figure 11: Add service provider details
- Next is a confirmation screen with a reminder that you have some steps still to do. Choose OK to continue.

Figure 12: Reminder of remaining steps
- The final steps enable the application for your users. Select the application from the list and choose EDIT SERVICE from the top corner.

Figure 13: Edit service
- Change the service status to ON for everyone and choose SAVE. If you want to manage access for particular users you can do this via organizational units (for example, you can enable the AWS SSO application for your engineering department). This doesn’t give access to any resources inside of your AWS accounts. Permissions are granted in AWS SSO.

Figure 14: Service on for everyone
You’re done configuring AWS SSO in G Suite. Return to the browser tab with the AWS SSO configuration.
AWS SSO configuration
After creating the G Suite application, you can finish SSO setup by uploading Google IdP metadata in the AWS Management Console.
To add identity provider metadata in AWS SSO
- When you configured the custom application in G Suite, you downloaded the GoogleIDPMetadata-your_domain.xml file. Choose Browse… on the configuration page and select this file from your download folder. Finish this step by choosing Next: Review.

Figure 15: Upload IdP SAML metadata file
- Type CONFIRM at the bottom of the list of changes and choose Change identity source to complete the setup.

Figure 16: Confirm changes
- Next is a message that your change to the configuration is complete. At this point, you can choose Return to settings and proceed to user provisioning.

Figure 17: Settings complete
Manage Users and Permissions
AWS SSO supports automatic user provisioning via the System for Cross-Identity Management (SCIM). However, this is not yet supported for G Suite custom SAML applications. To add a user to AWS SSO, you have to add the user manually. The username in AWS SSO must be the primary email address of that user, and it must follow the pattern username@gsuite_domain.com.
To add a user to AWS SSO
- Select Users from the sidebar of the AWS SSO overview and then choose Add user.

Figure 18: Add user
- Enter the user details and use your user’s primary email address as the username. Choose Next: Groups to add the user to a group.

Figure 19: Add user
- We aren’t going to create user groups in this walkthrough. Skip the Add user to groups step by choosing Add user. You will reach the user list page displaying your newly created user and status enabled.

Figure 20: User list
- The next step is to assign the user to a particular AWS account in your AWS Organization. This allows the user to access the assigned account. Select the account you want to assign your user to and choose Assign users.

Figure 21: Assign users
- Select the user you just added, then choose Next: Permission sets to continue configuring the effective permissions of the user in the assigned account.

Figure 22: Select user
- Since you didn’t configure a permission set before, you need to configure one now. Choose Create new permission set.

Figure 23: Create new permission set
- AWS SSO has managed permission sets that are similar to the AWS managed policies you already know. Make sure that Use an existing job function policy is selected, then select PowerUserAccess from the list of existing job function policies and choose Create.

Figure 24: Create permission set
- You can now select the created permission set from the list of available sets for the user. Select the PowerUserAccess permission set and choose Finish to assign the user to the account.

Figure 25: Select permission set
- You see a message that the assignment has been successful.

Figure 26: Assignment complete
Access an AWS Account with G Suite
You can find your user portal URL in the AWS SSO settings, as shown in the following screenshot. Unauthenticated users who use the link will be redirected to the Google account login page and use their G Suite credentials to log in.
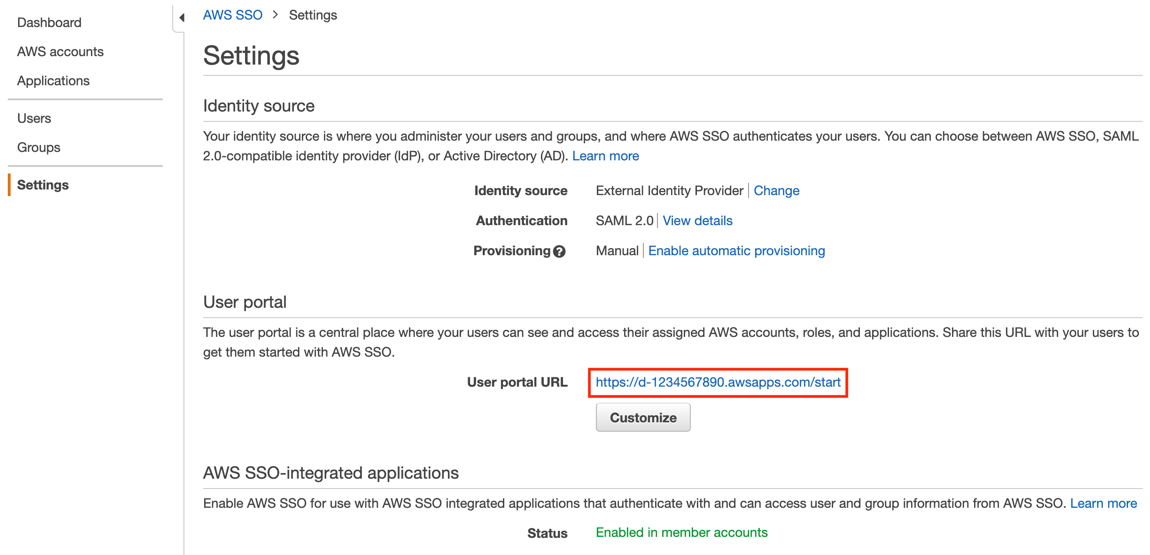
Figure 27: The user portal URL
After authenticating, users are redirected to the user portal. They can select from the list of assigned accounts, as shown in the following example, and access the AWS Management Console of these accounts.
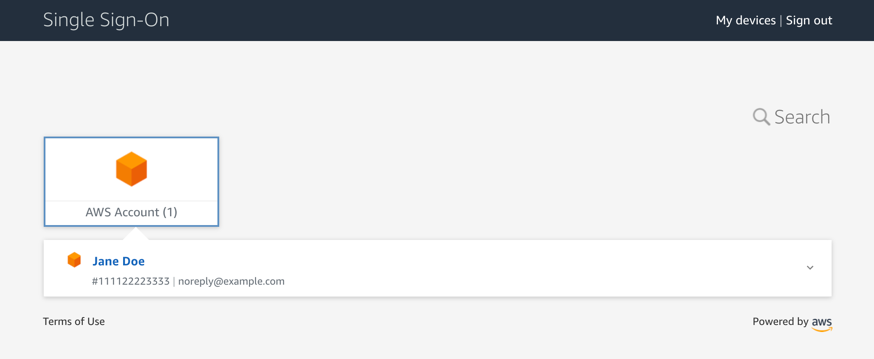
Figure 28: Select an assigned account
You’ve successfully set up G Suite as an external identity provider for AWS SSO. Your users can access your AWS accounts using the credentials they already use.
Another way your users can use AWS SSO is by selecting it from their Google Apps to be redirected to the user portal, as shown in the following screenshot. That is one of the quickest ways for users to access accounts.
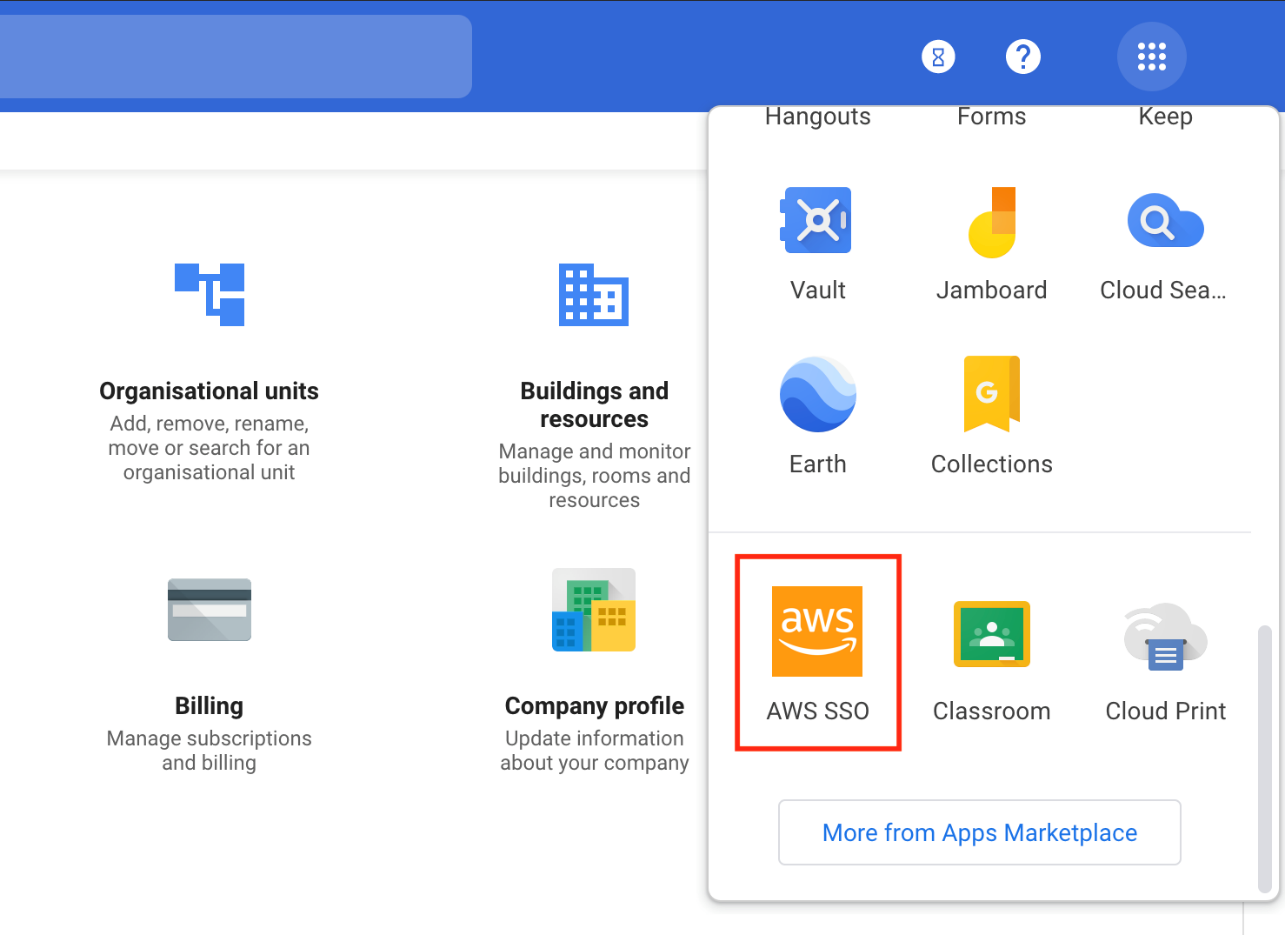
Figure 29: Apps in the user portal
Using AWS CLI with SSO
You can use the AWS Command Line Interface (CLI) to access AWS resources. AWS CLI version 2 supports access via AWS SSO. You can automatically or manually configure a profile for the CLI to access resources in your AWS accounts. To authenticate your user, it opens the user portal in your default browser. If you aren’t authenticated, you’re redirected to the G Suite login page. After a successful login, you can select the AWS account you want to access from the terminal.
To upgrade to AWS CLI version 2, follow the instructions in the AWS CLI user guide.
Conclusion
You’ve set up G Suite as an external IdP for AWS SSO, granted access to an AWS account for a G Suite user, and enforced fine-grained permission controls for this user. This enables your business to have easy access to the AWS Cloud.
If you have feedback about this post, submit comments in the Comments section below. If you have questions about this post, start a new thread on the AWS Single Sign-on forum or contact AWS Support.
Want more AWS Security how-to content, news, and feature announcements? Follow us on Twitter.